Class < Getting Started:How to Transform Your Classroom with iPad Apps < Lesson 1 - Getting Started with your iPad
Introduction
Many teachers are concerned with what to do when they initially receive their iPad. While some people are tech savvy, many teachers are not and can feel a little bit daunted by what to do. So that teachers get the most out of their iPad, it is really important that they feel comfortable with their device, know how to navigate their way around the device, have some idea how to troubleshoot when a problem occurs, and ultimately feel that the iPad will be secure and safe with their students.
So, here is a basic checklist on what to do when you initially open the box of your iPad:
1. Turning the iPad on:
The iPad has a button at the top of the device and you have to hold it down to power on and hold it down again to power off. With the latest iOS 7 & 8 update, you now have to enter in a passcode and then swipe to enter into the main screen of the device. Click here to be taken to the official Apple iPad iOS 8 Guide.

Connecting to Internet (WiFi)
Press < SETTINGS < WIRELESS & NETWORKS < WI-FI SETTINGS and then select WI-FI to turn in on.
Next, choose your network, enter the password and press CONNECT. It's that easy.
If you have internet at home, just find your network and you will be prompted to enter your password.
School Tech Support workers tend to be the ones who set up the network settings on your school device. This can be a good and a bad thing. It can be a good thing because they will do the technical work for you; but it can be a bad thing because they will often block certain sites, or put in settings that make the iPad difficult to access anywhere else other than school.
This is a discussion your school should have and I strongly suggest that they don't 'turn off' sites. Instead you can set up the iPad to reduce access to YouTube, certain apps, the internet etc in the Settings & Parental Controls.
(Go to the iPad Manual linked here if you need more information on how to do this).
However, the iPad's parental controls are extremely good and you can prevent students from uploading and deleting apps; purchasing anything from the App Store and accessing sites with certain ratings. Click on this great site here which explains, with screenshots how to achieve this.
If your school insists on blocking YouTube, there are other alternatives. For example, you can use software such as YouTube Downloader (Click on link to go their website) to download educational videos that you would like your students to watch and store them on the device. This is a really good option if this is a video you intend to use regularly. There is a free version, but you can only download one video at a time. I use this version and don't find it limiting.
Second, make sure your 'techs' make it possible for you to also access the device using your WiFi at home or anywhere else. Restricting use outside of school means that you won't be able to search for apps at home; work on apps that require internet access (and most do on some level, especially for sharing); and practice using the apps so you can prepare for a lesson.
I've heard from many teachers that some of the policies of schools and restrictions placed by 'techs' limit much of the iPad's use, so ensure that this is part of your policy making decisions. (Policy decisions will be discussed further in this lesson).
2. Purchasing Apps
You go to the App Store on your iPad (or iPhone) to purchase and download apps.
You can search for your apps either by category, name or developer. If I find a developer I like, I will always take a look at what they have to offer. You will need an iTunes account, or an iTunes gift card. Either way you do have to set up an account. It is impossible to download apps without an iTunes account, but you can get by without using a credit card. Many of the schools that participated in the early iPad trials, started with iTunes cards. For example, they allocated a card to each classroom, or for each student. I personally think if we are going to 'differentiate' using the iPad it is important to ensure that each iPad is individualized to suit each student's needs.
Since the iOS 7 and subsequent ios 8 update, you can back up apps, documents and photos to iCloud (this is covered further below). Apple provides 5.0 GB for free. If you need any more, you do have the option to purchase more storage.

However, as stated above, since the latest ios updates, App updates now occur automatically. This saves having to go in and do them manually, which I personally think is a great time saver.
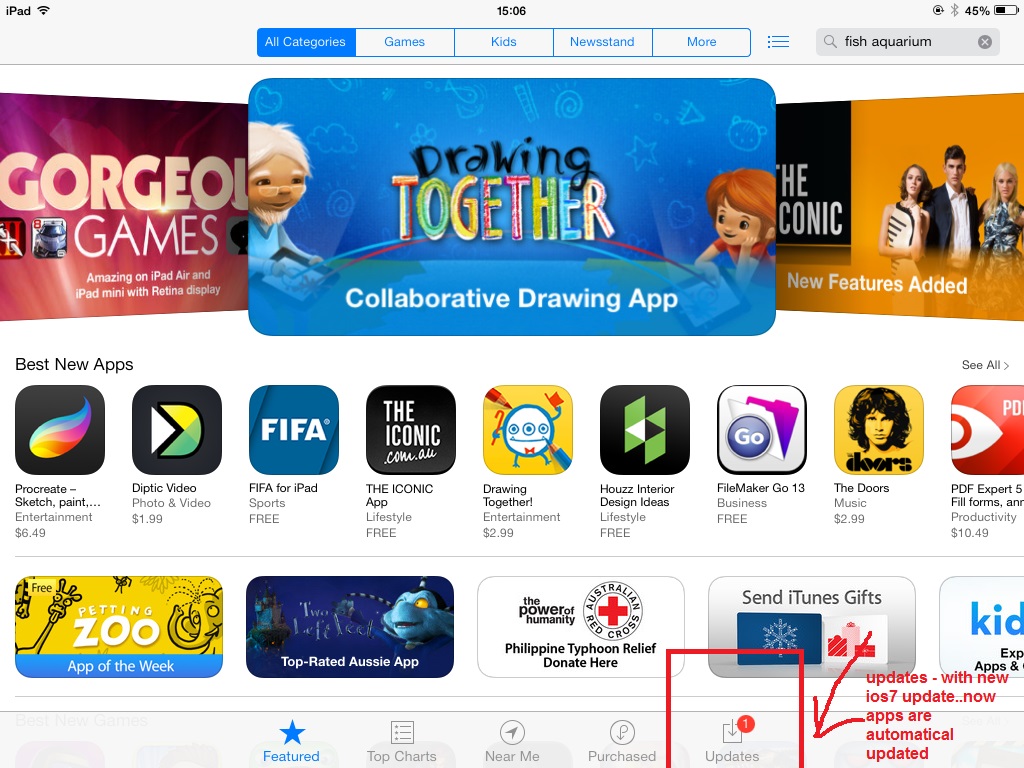
You can also find your purchased items on your iPad from the App Store. Look at the bottom of the screen and you will see ‘Purchased’. Click on 'Purchased' and you will see the following:
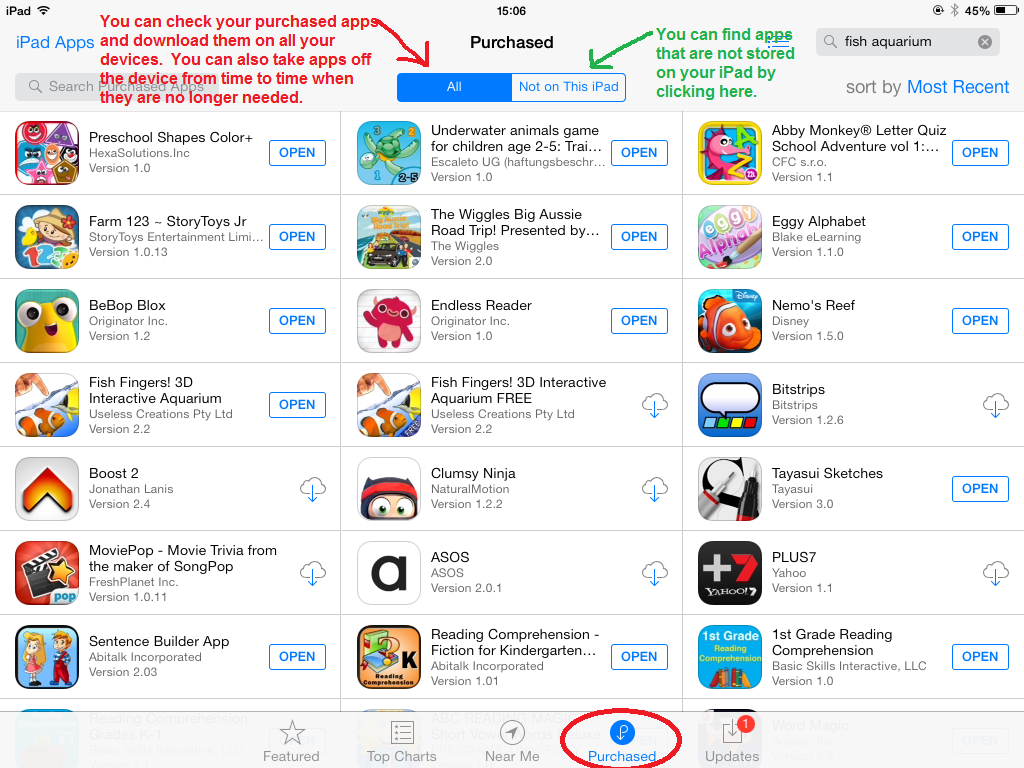
You can choose to view all the apps you have purchased, or only the apps you do not have on your iPad. Simply hit the down arrow next to the app and you will be asked to put in your Password and then the app will download.
I'm also concerned that many schools make it almost impossible for teachers to download a new app that they want to use in their classroom. I hear stories of teachers having to apply to upload the app and then it has to be approved, which can take months. This means that is months of valuable instruction that students are missing out on because of bureacracy.
Part of your school policy should allow teachers to download apps that are appropriate for them to differentiate instruction in their classroom. We have to trust that our teachers know what they are doing.
Multitasking with the new iOS updates:
You may already know that you can press the Home button twice to bring up a list of currently running or suspended apps. With the new iOS updates, Apple has added a whole new user interface for switching between apps.
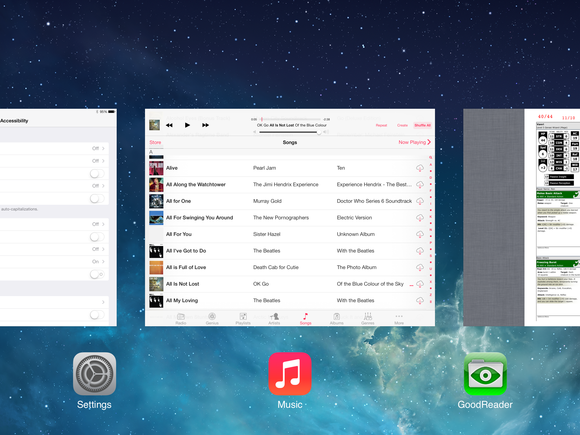
That new interface is completely different and instead of relying on a bar of app icons at the bottom of you iPad, you can double-click your device’s Home button to zoom out into a card-based interface, which shows you the app screens themselves (as they were when you last viewed them); tap any screen or the app icon below it to go to that app. You can quickly scroll over either the icons or the app screens to view your recent apps.
Not only does this make it easy to pick out which app you’re looking for, but it means you can quickly refer to a piece of information in one app without actually bringing that app to the foreground.
You can also now force-quit an app by just flicking the card up and off the screen, and the multitasking interface works in both portrait and landscape orientations on all iOS devices.
.png)
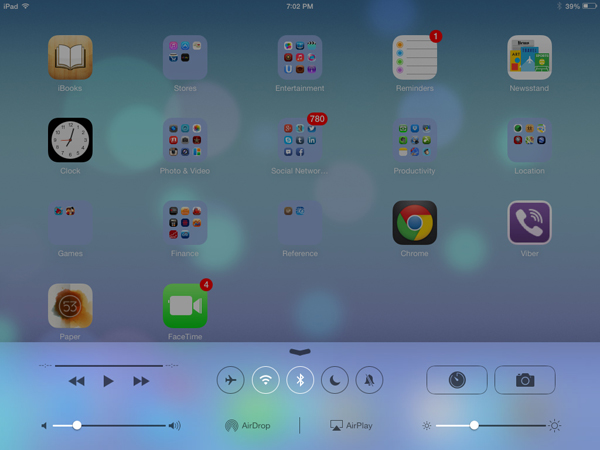
You can also swipe the multitasking bar top to bottom to quickly access audio/video playback controls, a shortcut to the iTunes App itself, and volume controls. This also provides access to a function that can lock the orientation of the iPad or to mute sounds. This is called the Control Center and allows you to quickly access the following by swiping up from the bottom of the screen. You can also do it on a locked screen.
- Airplane mode
- WiFi
- Bluetooth
- Do not disturb
- Portrait orientation lock
- Screen brightness
- Music navigation (next/previous songs, play/pause, column)
- AirDrop
- AirPlay
- Torch Light (camera flash on)
- Clock app
- Calculator app
- Camera app
3. What to consider before you deploy iPads into your school and classrooms:
• How will you use the iPad? I believe 1:1 iPad use is the most appropriate or viable way to deploy iPads into the classroom. This gives each student ownership over their iPad; all of their work is stored on the one iPad; the iPad is readily available to the student when they need to use it.
• Security Issues: ensure that the iPads are all set up to prevent students from accessing sites, videos or apps that are not appropriate for them.
• This way you can make available sites like YouTube that are normally restricted for students. Being able to restrict the content by setting age and ratings limits, means students can still watch age and education appropriate content. YouTube is an invaluable resource and I think shutting it off altogether cuts off access to some really great educational videos.
• What apps will you use and how will you use them? Having a core list of apps really helps.
When I first started out on this journey, I had too many apps. It was overwhelming for me to try to learn how to use them and then teach the students how to use them. I now think it is wiser to start with a few apps, get to know how to use them and how to use them in your classroom. Then you can add apps as you go.
• Make sure you know how the apps work. I suggest using the apps and playing with all the settings. Go through each step of the application and be aware of each step of the application. Can the app be adjusted in the settings section? Is there a way to make the app easier, or harder? Think about how you can use these apps in an educational context and how you can integrate the technology into your lessons.
NB: I am going to add an evaluation (click on word evaluation to be taken to a template that you can use) for apps that I think is really useful when considering your iPad choices. You can download it and use it each time you wish to purchase an educational app. Other things you can do to determine if an app is going to be beneficial for a classroom is: To go to the reviews of the app; go to YouTube to see if there are any video reviews or demonstrations; go to the developer's website as they often have app demos, videos and uses for the app on their site.
• Taking courses like this can help you to navigate your way through the minefield of apps and get some idea of what apps to use.
• Go to Vimeo, Teacher Tube and other teacher educational sites. There are many reviews on how to use apps on these sites and additionally there are lots of videos made by other educators on how to use certain apps in the classroom.
• This is a fantastic resource and one I highly recommend. When you explore what is out there, you discover that many teachers out in the world are doing fantastic things.
• The really good apps are made by really good developers. They care about you using their apps and generally will have a really good website with instructions using screenshots or video on how to use their apps. Good developers will have a space for feedback on their apps and are willing and happy to receive your recommendations. I’ve even had developers Skype with me to show me how to use their apps.
Also, if there is something missing in the app that you think would make the app better, don’t hesitate to recommend it to the developers. They take every comment on board and if they receive ‘x’ amount of requests for improvement, they will include it in their next updates. This is how they do their updates, by receiving your feedback.
• Allocate the iPad for educational use only. One of the very early decisions I made was to only have educationally based apps on the iPad.
• I believe it is a vital in the early days to leave all games that are not educationally based off the iPad. I think children have plenty of opportunity to play games using various other technologies like the Nintendo DS, Wii, Xbox, Computer games etc. Keeping the iPad as an educational tool ensures that students will view the technology from this perspective.
• The iPad should not be used a ‘fill in’ or for ‘rewards’ - if the technology is being used this way, then it is not being used effectively and more importantly is not being utilized to create the best possible educational outcomes.
• The device cannot do the work for you or replace you as a teacher. You have to drive its use, be at the control panel. You decide what apps to use, how to use them and how you connect them to your overall curriculum and lesson plans.
4. Security & Childproofing
- One of the most obvious security capabilities is the ability to Set up a Passcode to help prevent unauthorized use of your iPad.
Go to General > Passcode lock to set your Password and be sure to remember it.
- You can also make your passcode more complicated: iOS defaults to a four-number passcode, but you can turn it off by going to Settings>General>Passcode Lock>Simple Passcode.
Now you can use any full keyboard password to lock the iPad. The password also helps to encrypt your mail and attachments on the iPad, so you probably want to make it safer than a four-digit number. - Set the iPad to erase if too many wrong passwords are entered: You can set the iPad to erase all data after ten failed passcode entry attempts by checking the Erase Data option under Settings>General>Passcode Lock.
- Set the Auto-Lock feature to automatically lock your iPad after a designated amount of inactivity. You should choose your auto-lock time setting based on your normal usage but 30 minutes should work fine for most people.
Go to General > Auto lock choose amount of time (30-60 min)
- Disable Bluetooth if you do not plan to use it. If Bluetooth is active it is another potential vulnerability source, so if you are not using it shut it off.
Go to General > Bluetooth> Turn Bluetooth Off.
- Enable Fraud Warning within Safari browser to enhance security and to get warnings about potentially fraudulent sites.
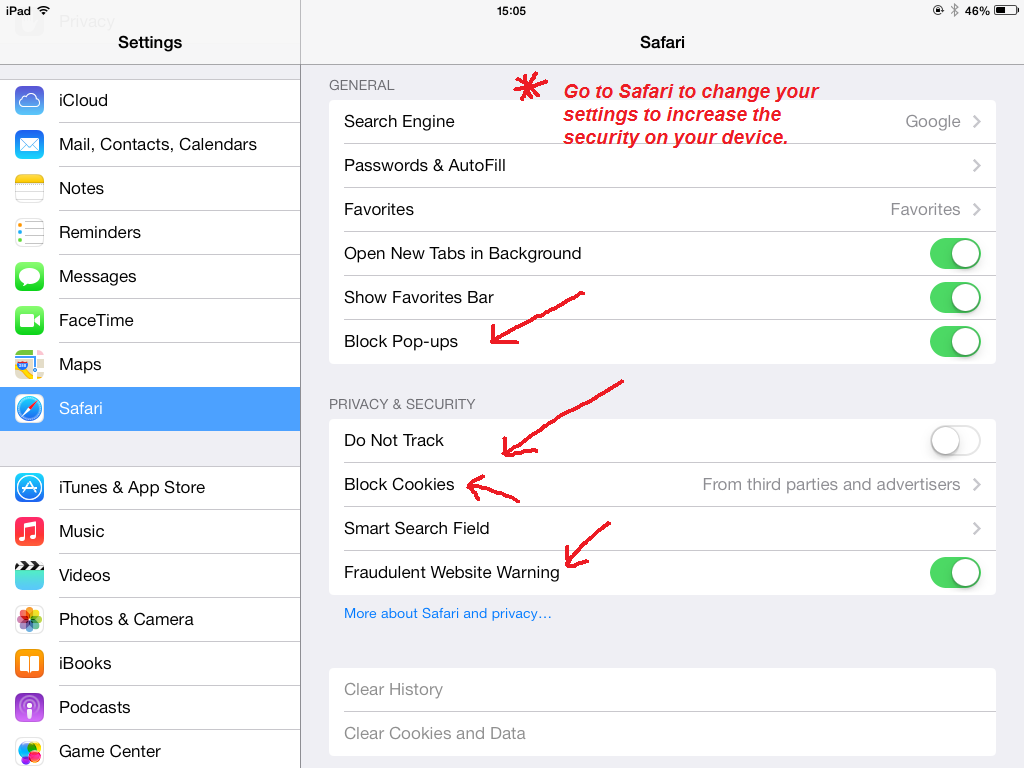
- Turn on Pop-Up Blocker
Go to Safari and down to Block Pop-Ups.
Childproofing Your iPad or Setting Parental Controls
The iPad Parental Control works by setting a four digit passcode on the iPad that is required when setting the different restrictions. Once enabled, you can set restrictions for apps, television, music and movies.
Therefore you are setting up your iPad so that only certain ‘age level’ apps, music, movies and TV programs can be downloaded and viewed on the iPad.
You can also disable the iTunes and App icons so that children cannot inadvertently or deliberately download music or apps. Kids can be quite savvy and this prevents any unwanted purchases on your account.
Go to General and go down to Restrictions. If you haven’t already set up a Password, the iPad will ask you to set up one once you enable restrictions.
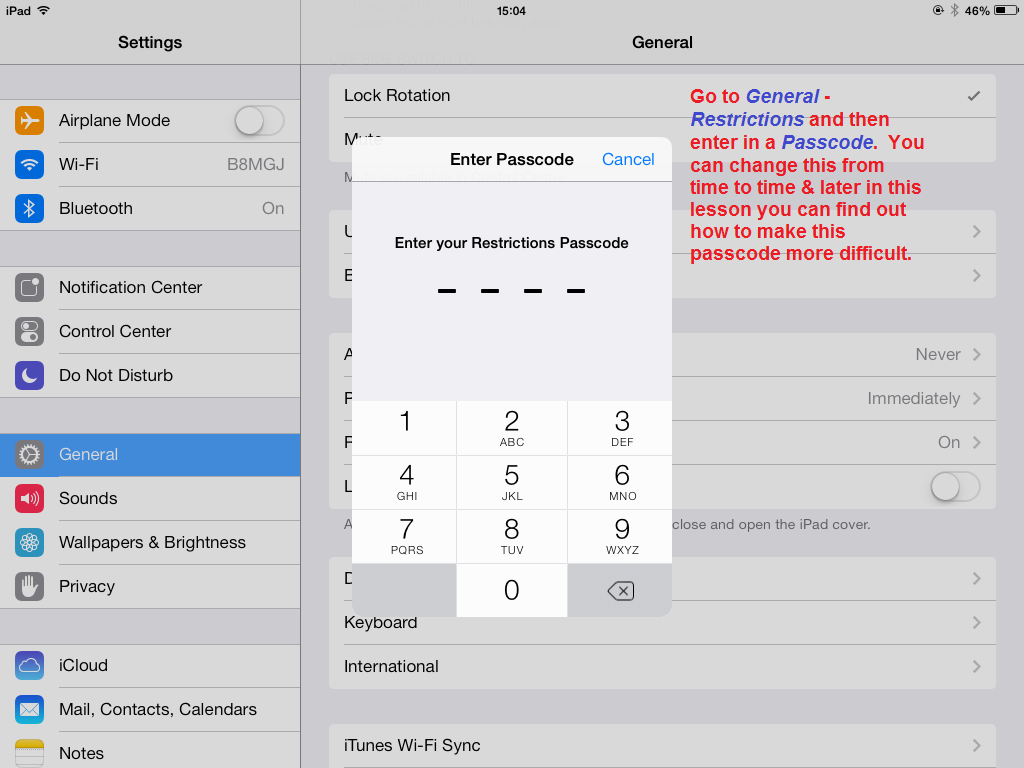
You can go to any of the Settings and create the Settings you require for your students.
.png)
Click on the area you wish to change. If you want to provide a restriction for iTunes, you can click on the ‘on’ button and it will give you options. Or as you can see below, you can disable the ability to upload and delete apps.
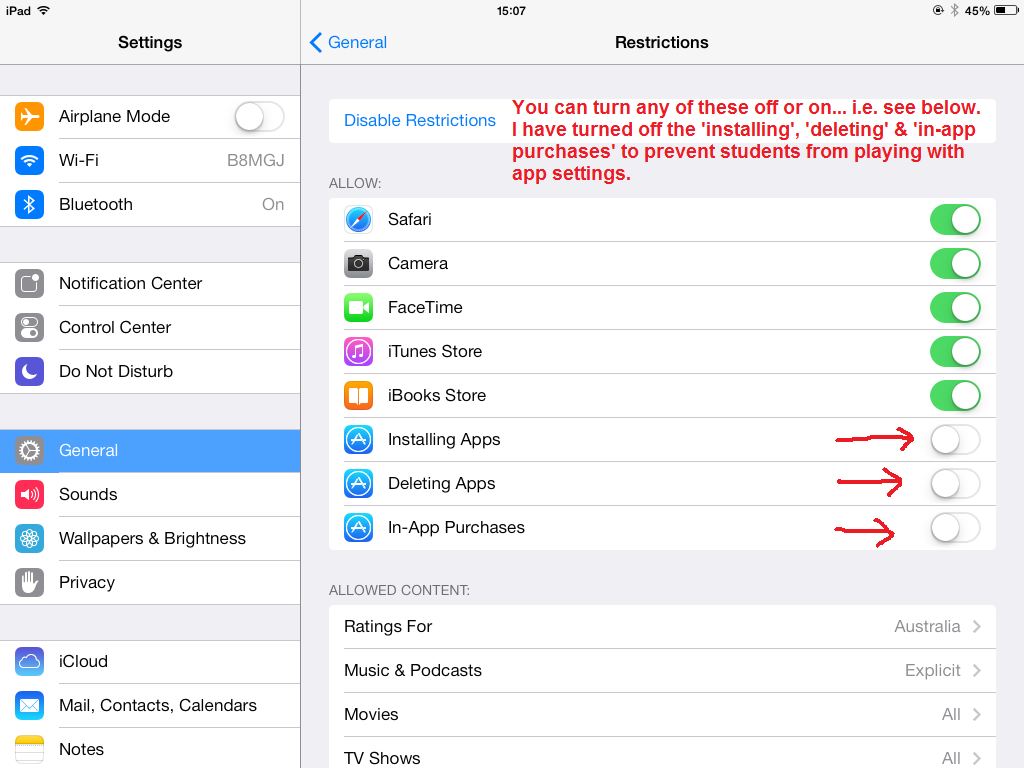
You can also choose the ratings of the movies, videos, apps and music that you want your students to be able to access. This way they can't access anything that is not age appropriate.
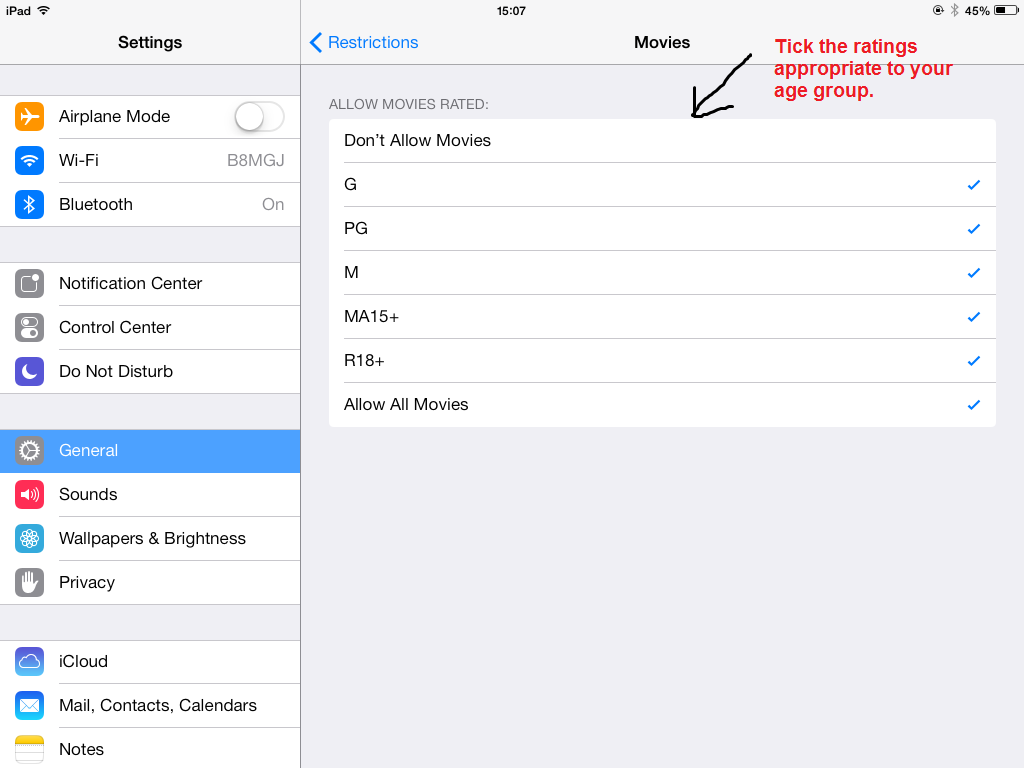
For example, you can only tick ‘G’ rated films; Apps for a specific age; or you can exclude all ‘explicit’ music. Go through each area and decide what changes you wish to make.
.png)
Just remember if you disable your app store, you won’t be able to update, or change the app in any way. To make changes, go back and enable the setting again.
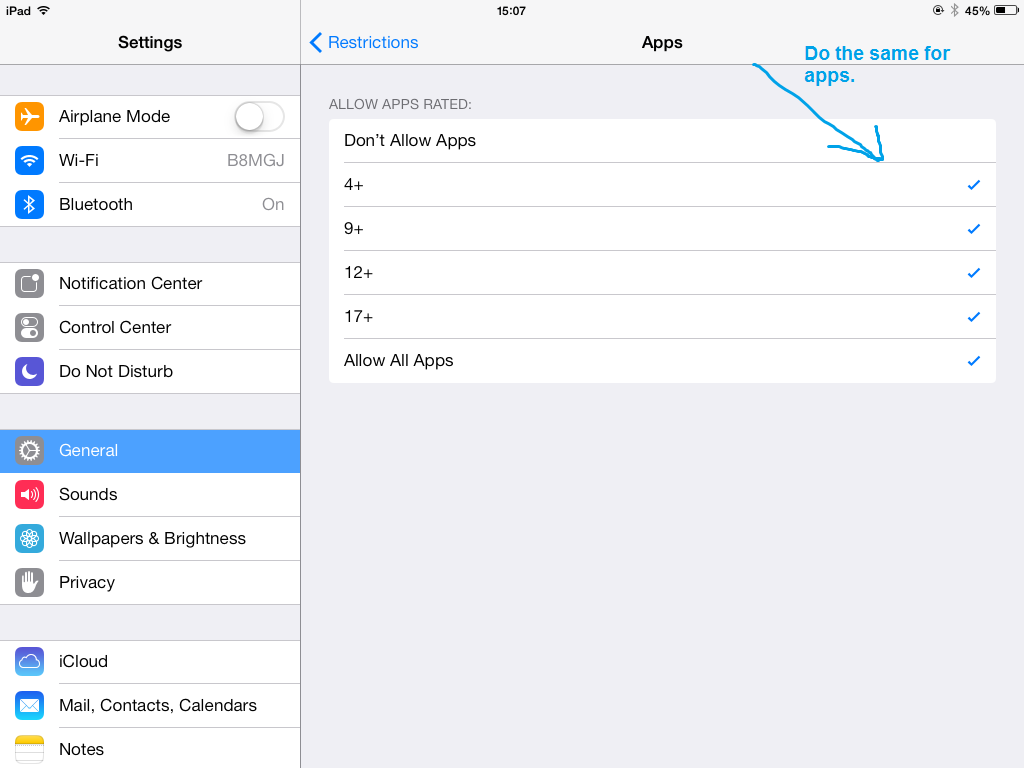
To turn off in App purchases: Go to Settings, General, Restrictions and tap Enable Restrictions to selectively enable restrictions that apply to your apps, content, Game Center, and more. If you're worried about other people breaking your bank account on in-app purchases, just disable in-app Purchases under the 'Allowed Content' setting.
5. Speak Selection, Voice Over & other Options for children with disabilities
Speak Selection & Voice Over
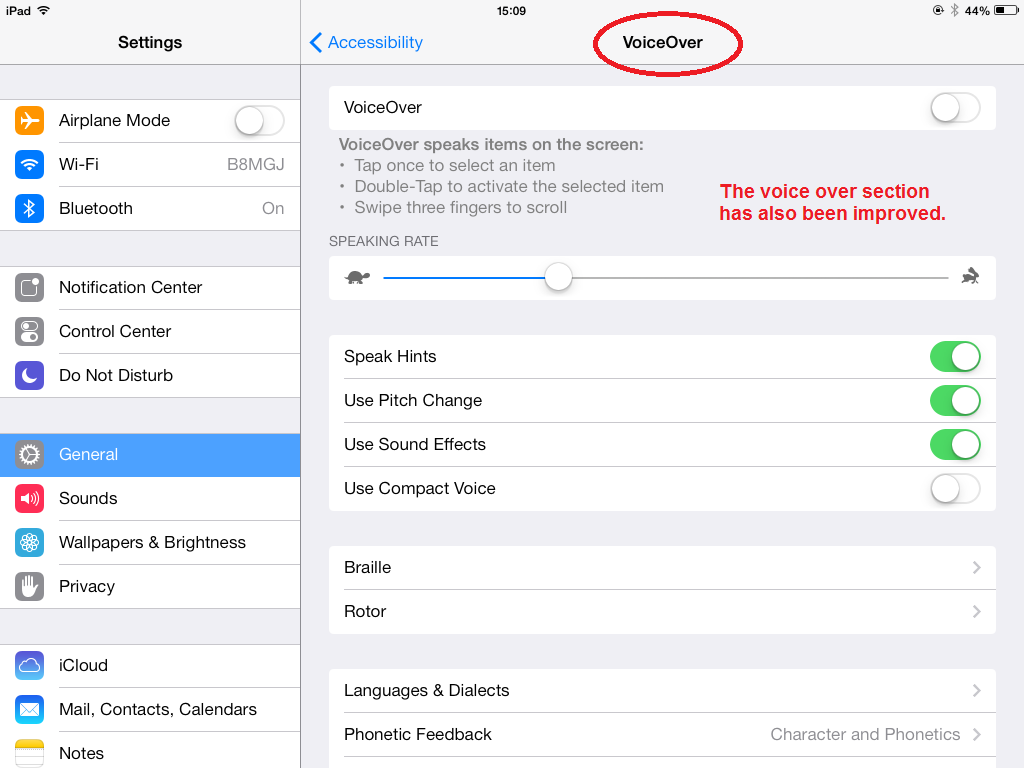
Talking innovations that made it into iOS 7 & 8 updates are Speak Selection and VoiceOver which can both be found under Settings > General >Accessibility (and both need to be enabled before you can use them).
This is a fantastic application for those students who have difficulty with reading, or sight and have been greatly improved in the latest updates.
Speak Selection adds a “Speak” option to any text that you select (be it a webpage, an email or a message you’re still typing) before reading the whole thing back to you at a swift pace. The speaking rate can be modified in the same settings menu as above.
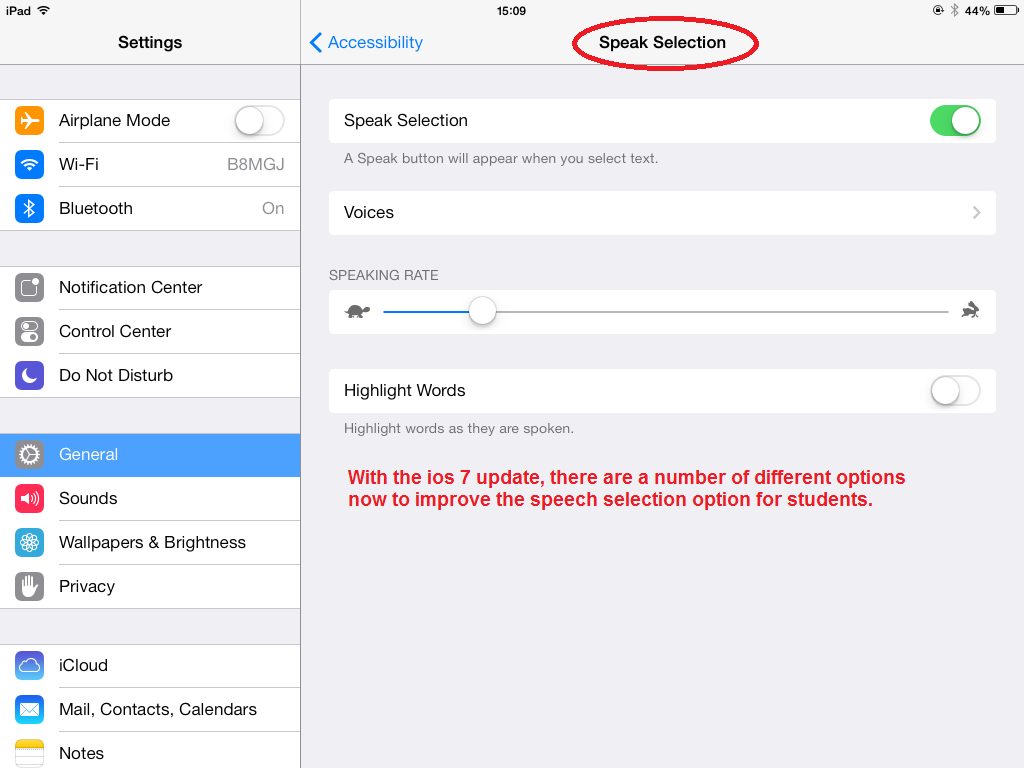
VoiceOver is another useful speaking option where the feature simply reads aloud from the screen you are on, listing options and other notes.
NEW UPDATES
Accessibility for those with disabilities have been hugely improved with the new iOS 7 & 8 updates. This means the voice over functions, text to speech, and functions for the non-hearing community makes the iPad an easy choice. Again it is impossible to cover them all, but here are a few of the important changes in the accessibility option:
General Changes
The iPad has a Triple Click Home option that can be activated so that you can opt out of any of these accessibility options at any time. This does have to be set up though however with the new updates, you can now tell Siri (Siri is now an integral part of Apple’s interface which uses a natural language to answer questions, make recommendations, and perform actions by delegating requests to a set of Web services using the microphone. To activate you can either hold down the ‘home’ button or bring your iPhone or iPad up to your ear to speak. Click here to find out more information about Siri.) to use the VoiceOver feature, invert colors, use assistive touch and guided access.
VoiceOver changes
The iPad has a really effective VoiceOver capability in built into its interface. This can be activated in Settings>General>Accessibility. There is also a Text to Speech option so that you can get the device to ‘Speak’ for you. This really makes the iPad an incredible device for those learners with special needs.

The list of gestures with VoiceOver continues to grow with each major release of an iOS update. One valuable addition is the four finger double tap. This enables VoiceOver help from anywhere. So instead of having to go in to Settings> General> Accessibility> VoiceOver > VoiceOver Practice, you can now do this gesture from anywhere and then do gestures and keyboard commands to find out their functions.
VoiceOver practice area, but will not work anywhere else. When in a text field, it simply inserts an A in to the document instead of performing its designed function.
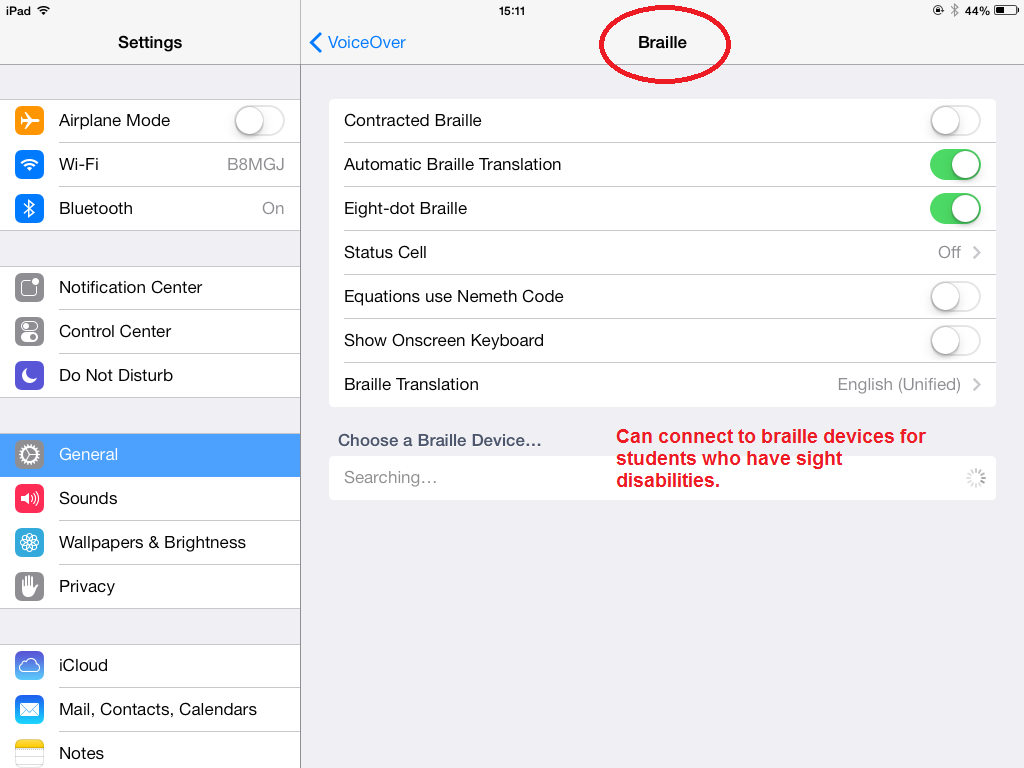
Braille can also be switched on for those students who use it and there are a variety of options within this selection. There are too many options to go into in detail but click here to read a really good review on the new iOS updates in the Accessibility section. Click here for another review from a 'low vision' user. I believe these are worth reading to gain a 'real' perspective of the benefits of the accessibility options.
Physical and Motor Accessibility
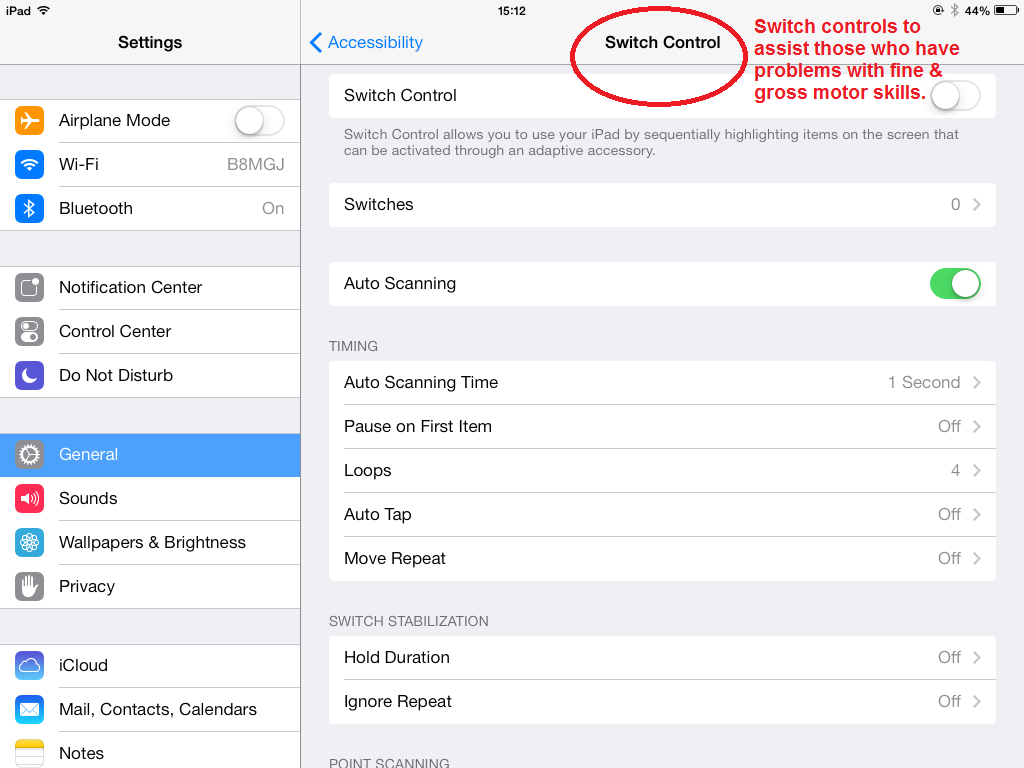
One major change that could open up a new world for those with physical disabilities that prevent them from interacting with the touch screen or a keyboard is the added ability to control your iDevice with a switch.
This means that even those with fine motor issues can use the iPad. There are more details on iOS 7 & 8 accessibility issues here.
|
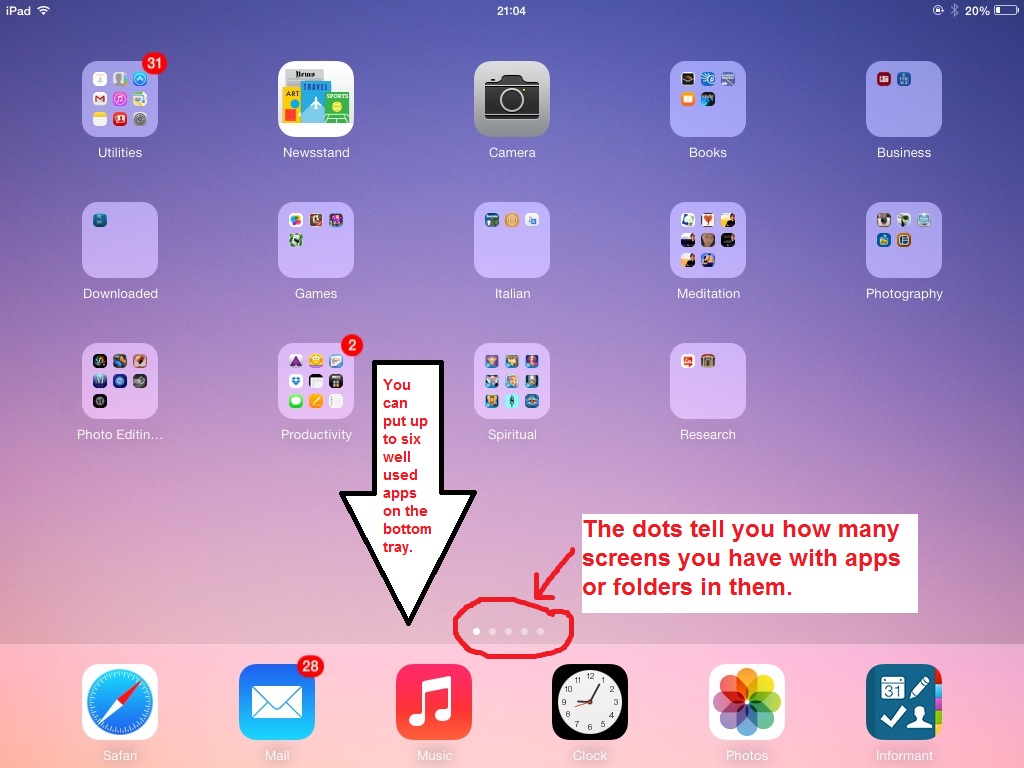
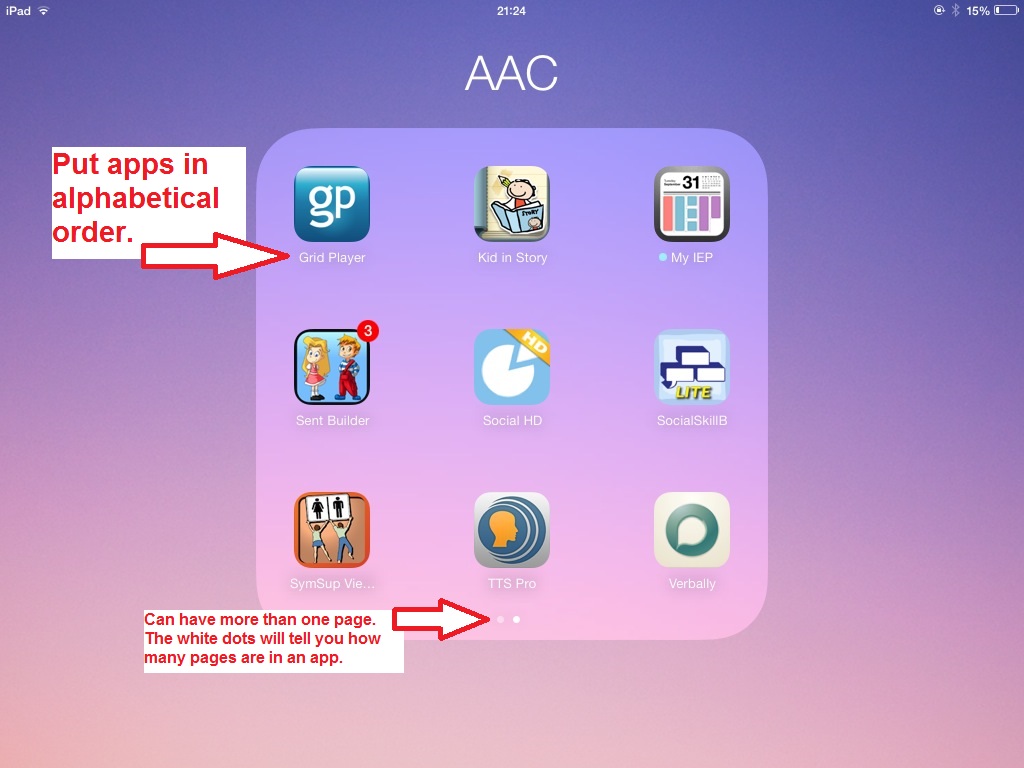
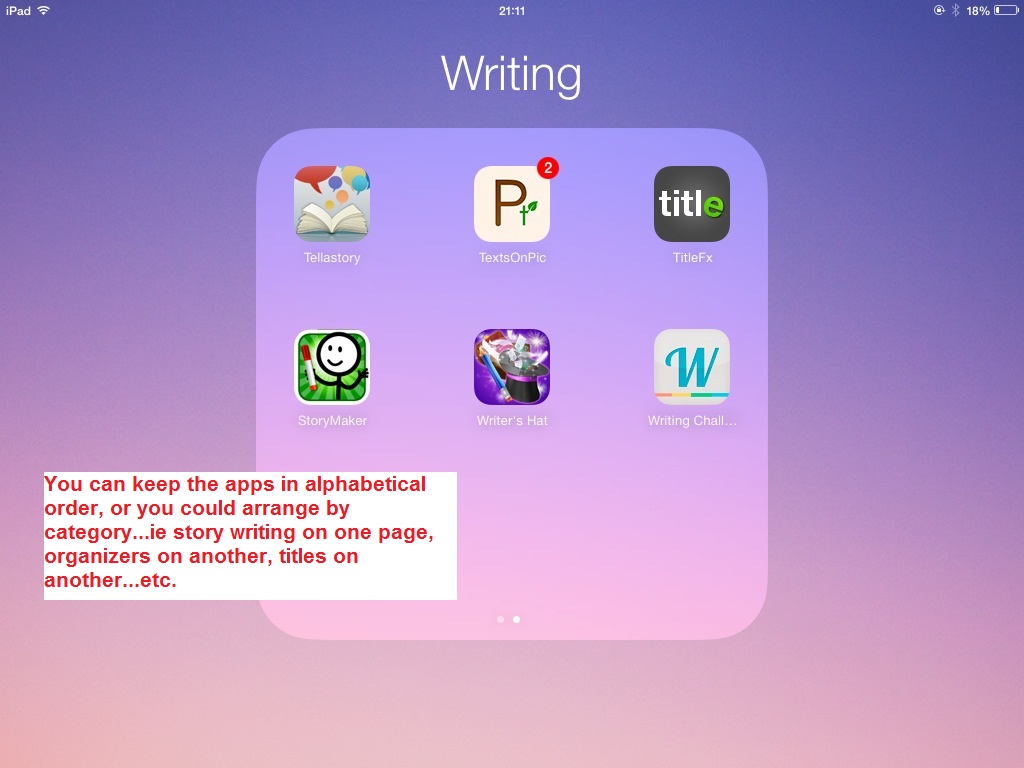
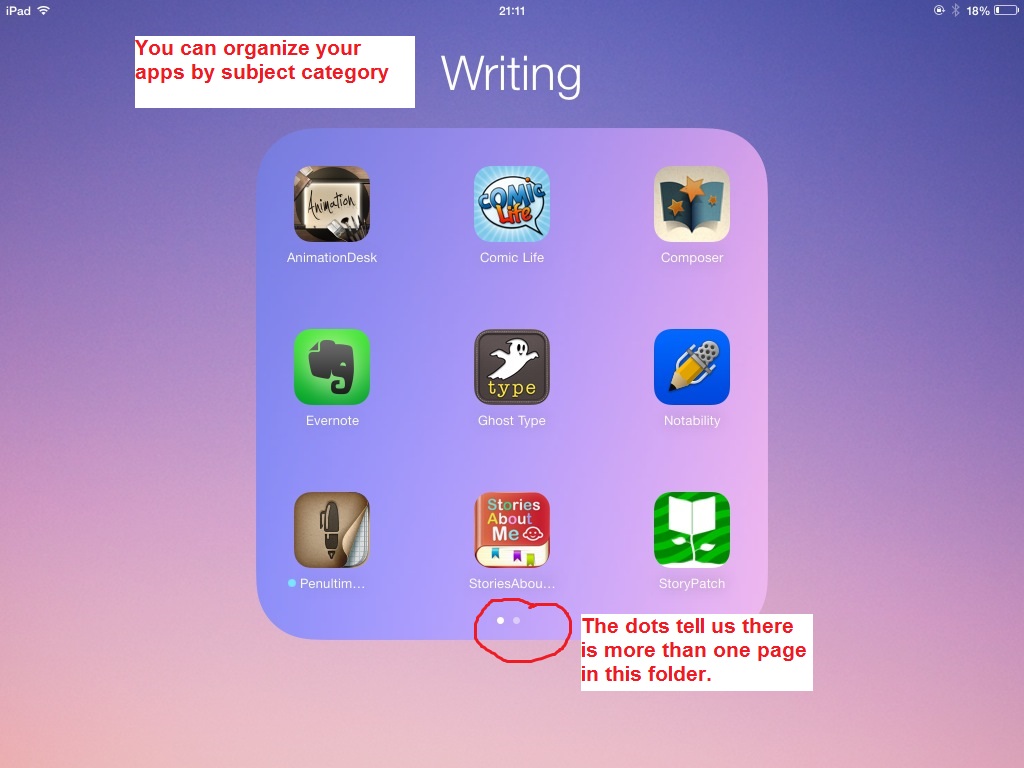
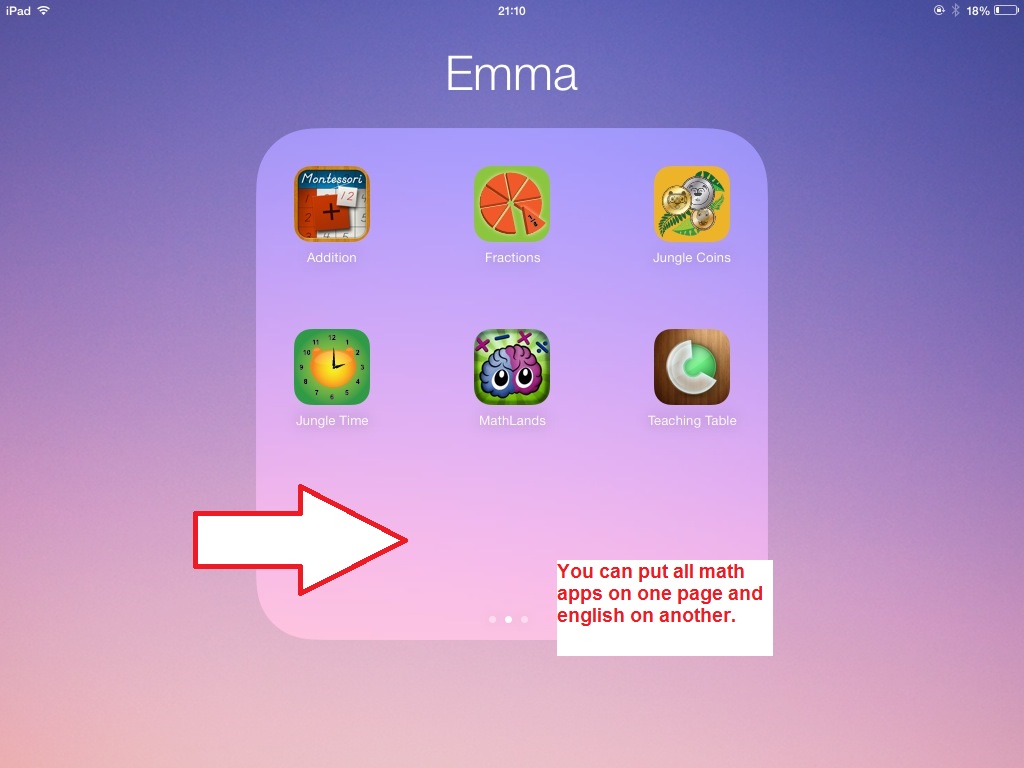
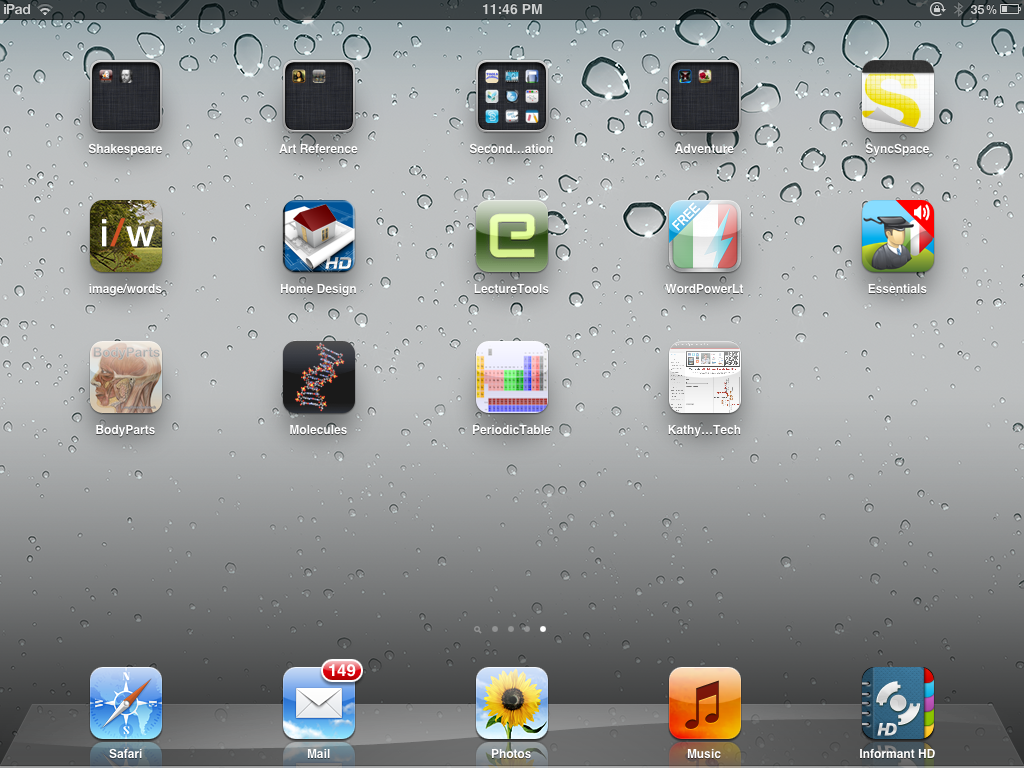
6. Organizing Your Apps If you have quite a few apps, it is time to organize them. There are a couple of ways to do this. This includes using iTunes or physically dragging apps around on your iPad. I think the best way is to rearrange your apps directly using your iPad. To rearrange apps on your iPad, touch an app and hold down until the app icons jiggle. Then, arrange the icons by dragging them. Press the home button to save your arrangement. If you have many apps, you can arrange and create up to 11 screens or pages. The dots above the Dock show the number of screens you have and the white one shows you the one you are currently viewing.
For apps you use frequently, you can create a shortcut by making those apps available on every page. Tap and hold an app. When it starts to jiggle, drag the app or folders of apps to the bottom of the screen (dock). This will allow you to find an app quickly, no matter which page you are on. To drag a folder into the dock, you will have to create it first on the screen, and then drag it to the dock.
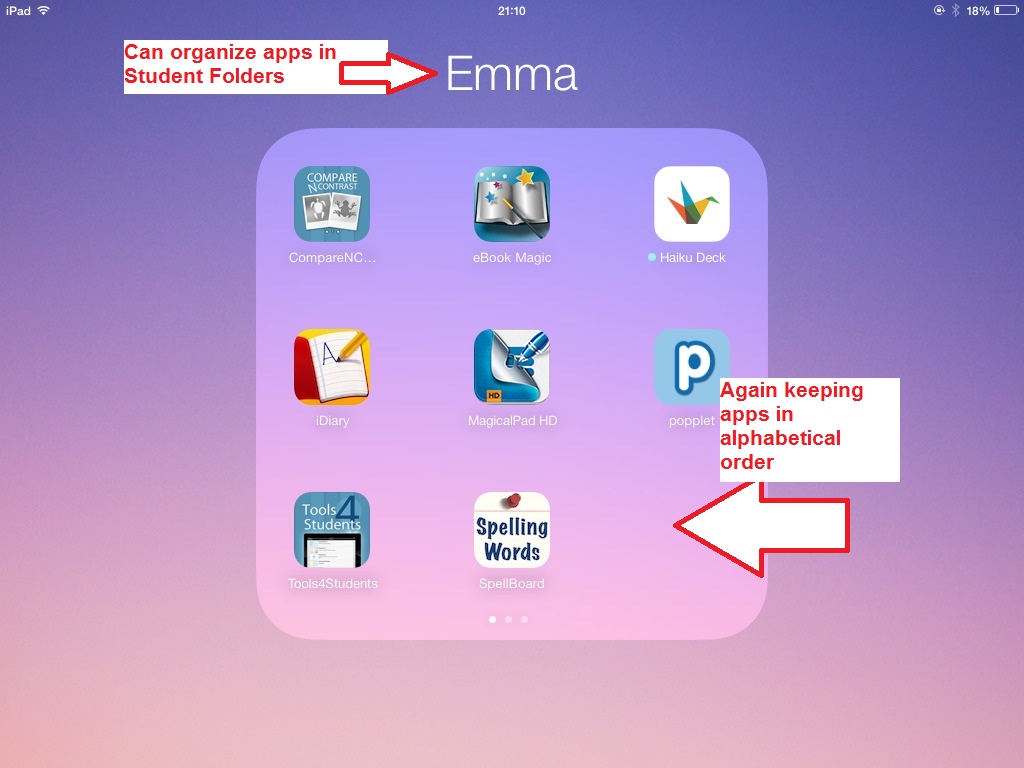
You can create folders by dragging an app into another app. The iPad automatically names a folder when you create it based on the icons used to create the folder. You can change the folder name by tapping the x and typing a new folder name. One of the best aspects of the new updates are the ability to add more than 20 apps to one folder. I have over 400 apps and there are certain folders that contained a lot of apps in them. For example, the Numeracy Folder. Now I can add as many Numeracy apps as I want. What I do now is create a page for each 'Math' concept area. For example, Geometry within a folder, Numbers in another, and so on.
You can get rid of a folder, by dragging all the apps out of the folder. You can delete an app by holding down the ‘x’. Organizational Methods There are many ways you can arrange your apps including by location, alphabet or categories. I have organized my apps according to Subject i.e. Literacy, Numeracy, Spelling, Writing, Art, etc. Everyone has their own system, so it is best to stick with what works for you. If you are organizing apps for students, make sure they are names that the students can read; or to begin with you might use the first letter of the folder instead, i.e. E for English, M for Math. If you have to share the iPad with a number of students, you can organize your apps by the name of the student; then within that folder, you can have all your Math apps on one page, English on another etc.
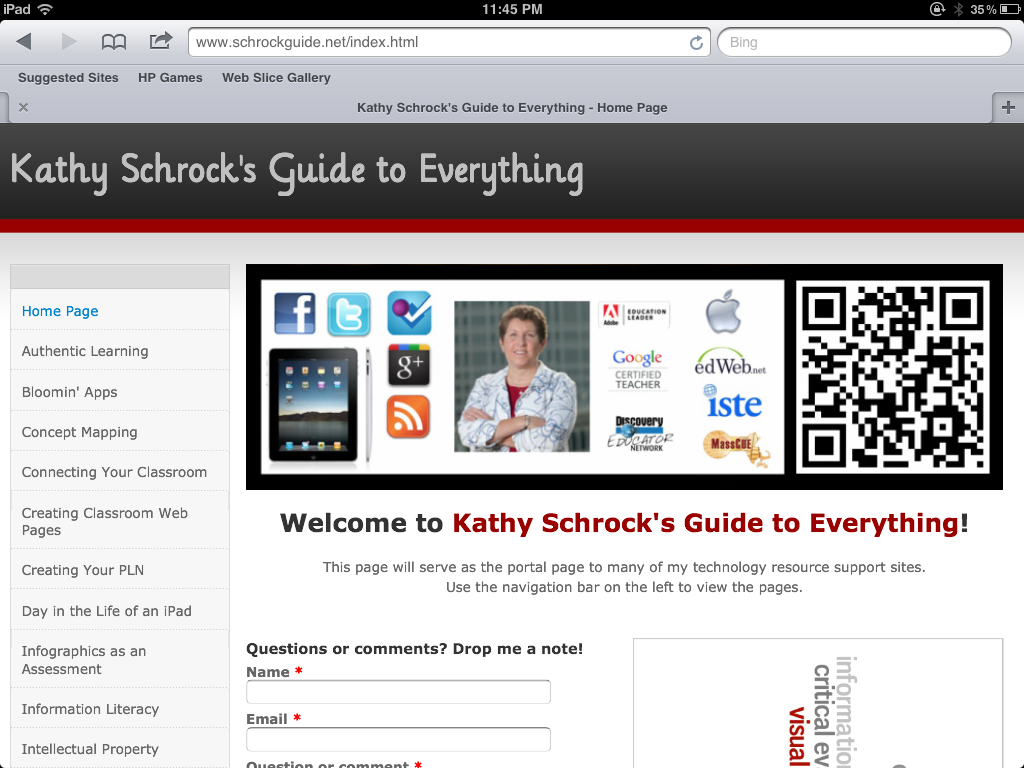
TIPS ON THOSE APPS YOU CAN’T DELETE There are some apps that you can’t delete because they do not have an ‘x’ button. This is because you are not allowed to delete the default apps that come installed on your iPad. These include the Calendar, Contacts, iTunes, App Store, Game Center, etc. However, you can delete the icons for these apps by enabling Parental Controls on your iPad. We go over how to enable parental controls in above. How to Add Home Screen Icons in Safari for the iPad The iPad's Safari browser gives you the ability to add Home Screen icons which automatically open your favorite Web Pages. First, open your Safari browser. Your Safari browser window should now be displayed on your iPad. Navigate to the Web page that you wish to add as a Home Screen icon. In the example above, I have gone to Kathy Schrock's Guide to Everything page.
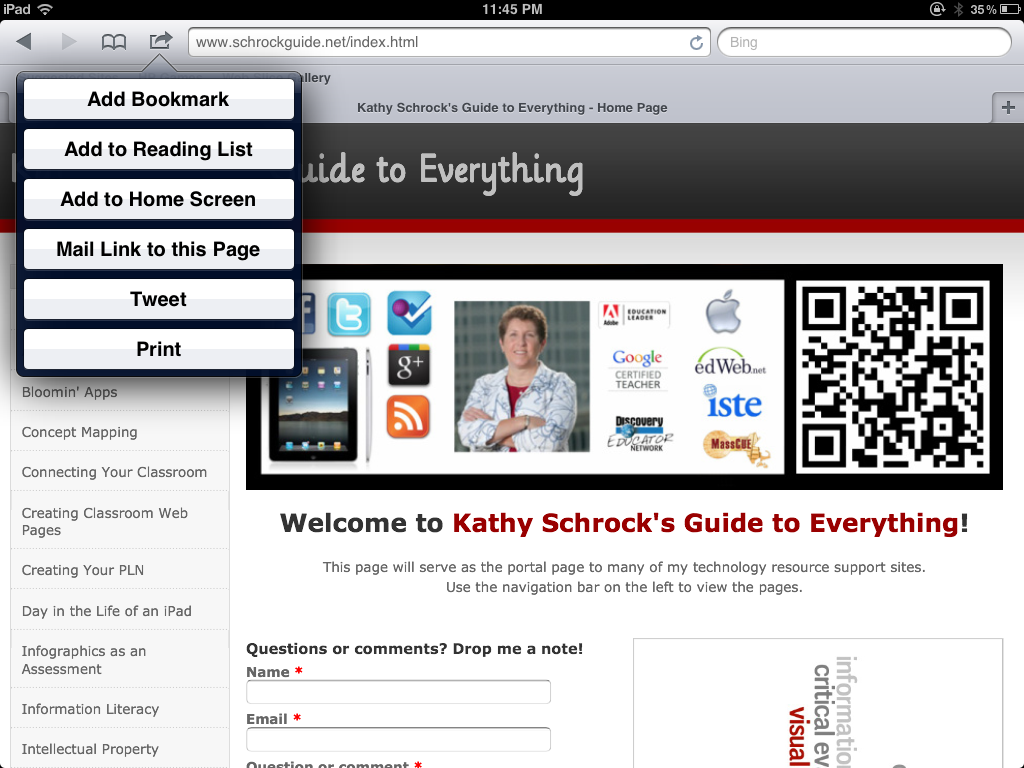
Once the desired page has finished loading, tap on the arrow button located at the left, top of your screen and you will see the follow list. Click on Add to home screen.
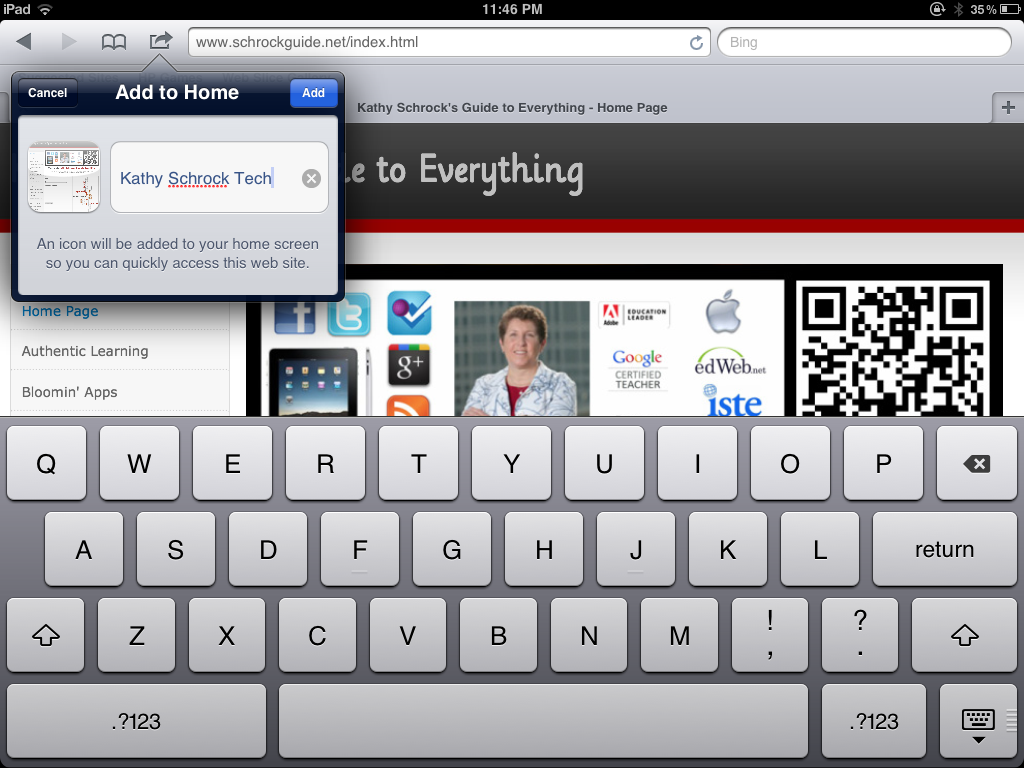
Rename the icon so you can easily find it on your iPad. Now click the Add button.
The icon appears on the Home screen I create icons for the websites I use regularly such as my bank website or internet provider. This saves a lot of fiddling and clicking on the icon will take you straight to the front page of that website
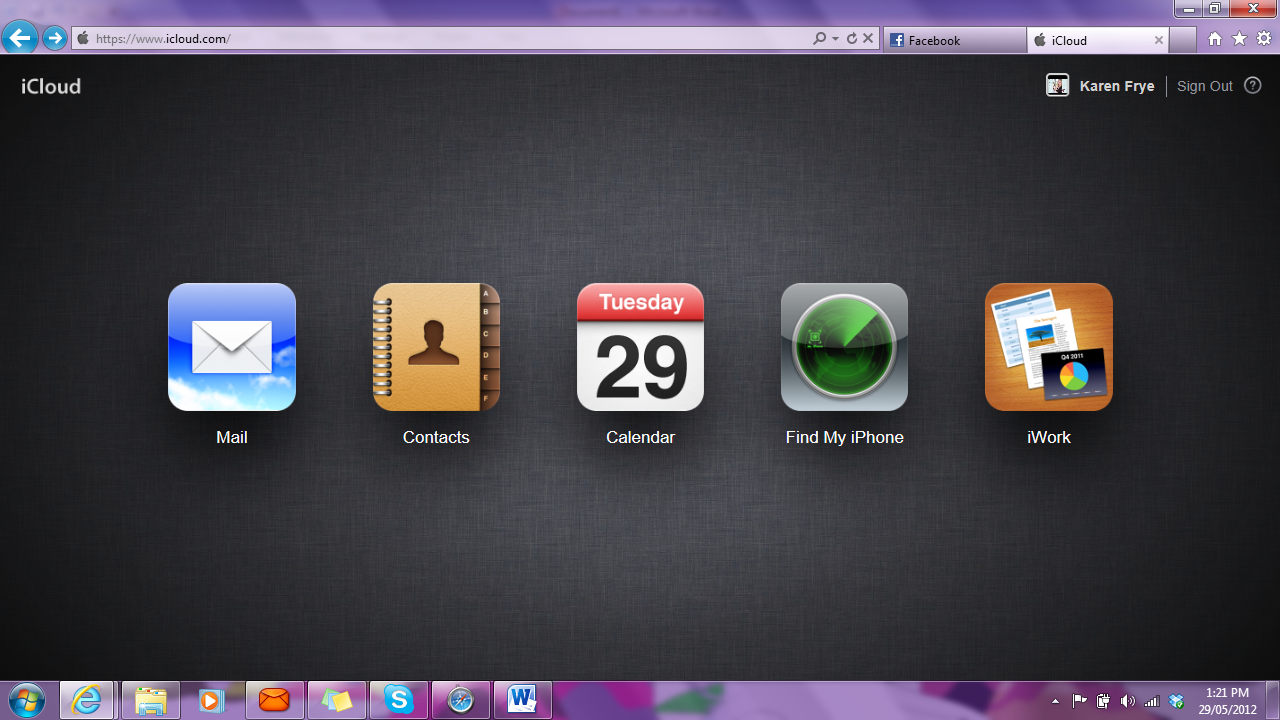
What is the iCloud? The iCloud stores your music, photos, documents, and more and wirelessly pushes them to all your devices, i.e. From your iPhone to your iPad and back. This transfer is automatic, effortless, and seamless - and it just works. iCloud now comes with every new Apple device and makes transferring of your data, backing up your content and restoring content much simpler. Before you had to connect to iTunes and your PC or Laptop to set up your device. Thankfully now all set up and future back ups can be done independently. iCloud is so much more than a hard drive in the sky. It makes it quick and effortless to access just about everything on the devices you use every day. iCloud automatically and securely stores your content so it's always available to your iPhone, iPad, iPod touch, Mac, or PC. No syncing is required. No management required. In fact, nothing is required as the iCloud does it all for you. Free gets you a lot. You get What is stored in the iCloud: Photo Stream All your photos can be stored in the iCloud and even better, when you take a photo on one device, it automatically appears on all your other devices. No syncing. No sending. Your photos just appear. iTunes in the Cloud With iCloud, the music you purchase in iTunes appears automatically on all your devices. You can also download your past iTunes purchases. Documents in the Cloud If you have the same iCloud-enabled apps on more than one device, iCloud automatically keeps your documents up to date across all your devices. Apps, Books & Backup iCloud makes sure all your devices have the same apps and books. It also backs up your information, so if something happens,you can go back and access them from the cloud. Calendar, Mail & Contacts iCloud stores your calendar, mail, and contacts and automatically pushes them to all your devices. So you can switch from one device to another and still go about business as usual. You can sign into your iCloud account using your iTunes ID and access all your details. See the screenshot to see what the front page of iCloud looks like:
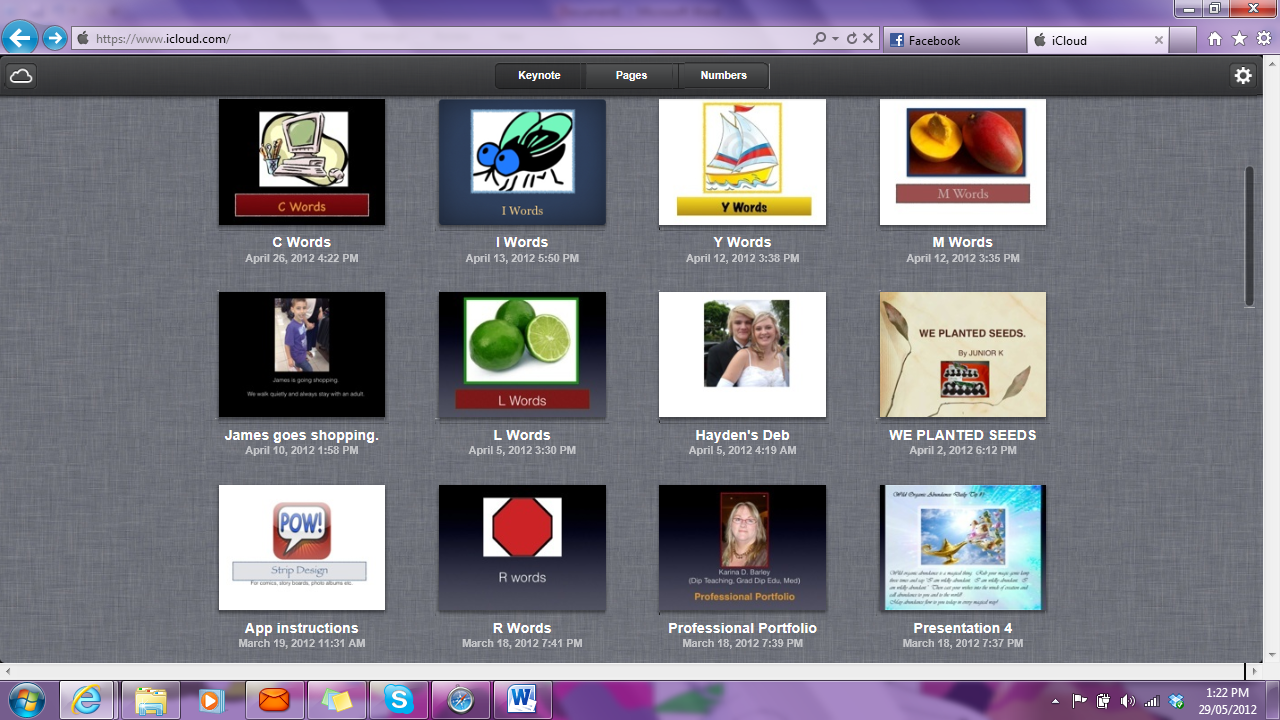
Inside your documents, you can see everything that is in your Keynote, Pages or Numbers. See below:
Watch the video linked here as it gives a brief overview of the iCloud and how it works. iPAD POLICY The focus of any iPad program is to provide tools and resources to the 21st Century Learner. Excellence in education requires that technology is seamlessly integrated into any school's curriculum by increasing access to technology and one of the learning tools of these 21st Century students is the iPad. The individual use of iPads is a way to empower students to maximize their full potential and to prepare them for college and the workplace.
Adding technology to the classroom does not diminish the vital role of the teacher. Rather, it transforms the teacher from a director of learning to a facilitator of learning. Students organically become much more self directed and independent as learners when they are given the opportunity to use the iPad within the classroom. Effective teaching and learning with iPads integrates technology into the curriculum anytime, anyplace.
Any policy should reflect what you require students to achieve using technology. I've seen too many policies focus on rules and regulations around iPad use and while security; keeping children safe on the internet etc is important; we don't want to have so many rules that we limit the use of the iPad either. It becomes a bit of a balancing act, ensuring you keep children safe and giving them freedom to learn.
WHAT YOUR iPAD POLICY SHOULD CONSIDER:
It is a good idea to research other iPad policies implemented in other schools. I think Defiance City School in Ohio has a really good iPad policy that is worth reviewing. Click on the name of the school to be taken straight to their website. |
© Karina Barley 2013


 and that does hold quite a bit. I have an iPad 64 and over 400 apps and I only just recently spent $29 for more GB and I have plenty of space left now.